Showing posts with label arts and crafts. Show all posts
July 14, 2014

DIY - Japanese Temari Ball (Flower Design)

Japanese Temari Ball (Flower Design)


Another project from my textiles arts and crafts class a year ago!
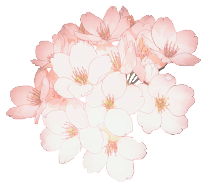


Temari ball is a decorative/embroidery ball that can have many different designs (from simple to elaborate/complicated). For my craft, I decided on a simple design with a few colors (white, light pink, gold and brown)
It may look simple and plain, but it takes a lot of time to make! If you're looking for a time consuming craft, this is it.


In process . . .

Applying and sewing the outer flower design with gold and brown 3-piece embroidery thread
 The light pink thread divides the ball into 8 sections

 Making an 8 point flower design in the middle with light pink thread.
I initially chose an orange/gold design but later switched it to brown/gold.
I thought that a dark color would contrast well with the lighter neutral colors.

 Using light pink thread to create a rose pattern in the middle (left)
Side view of the temari ball (right)


We weren't actually given instructions on how to make designs on the temari ball, so I searched online and found a basic flower shape. If you search online you can see some very elaborate and detailed embroidery which definitely puts my temari ball to shame ;o;
Using a fine/thin sewing thread for the base of the design looks better than a medium sized thread because it creates a smoother effect. I used a medium sized thread because I was lazy lol


MATERIALS:
- Small styrofoam ball (OPTIONAL, just makes it faster/easier to wind the thread around), medium sized thread or wool, sewing thread, sewing needle, pins and scissors.


Quick How-To Make / Instructions

Step 1
Use the medium sized thread or wool to wrap around the styrofoam ball until you can no longer see the ball. Once you have your desired size, tuck the thread into the ball. Or skip the styrofoam ball because that is so non-traditional and use the thread from start lol.
Step 2
Use sewing thread to wrap around the ball until the medium sized thread or wool underneath can no longer be seen. Tuck the thread into the ball so it won't stick out.
Step 3
Pin a "north" and "south" pole at opposite ends. Use pins to make an equator and also pin the halfway area between the north/south pole and equator. The area from the "north" to "south" pole will have 4 sections divided in horizontal lines.
Use pins to divide the ball into 8 sections forming vertical lines from the "north" to "south" pole, like orange slices by measuring 1/8th sections with paper.
Place pins to mark the sections and sew dividing lines with sewing thread. 
Step 4
Google how to make nice designs because that shit is fucking hard. HERE is a nicely detailed tutorial. Refer to Figure E if you're confused about the 8 section orange slice part.
Even though I'm writing from personal experience of making the ball, I am of no help here, sorry.


Okay so this tutorial may not be really helpful but if you have any questions let me know, and I'll try to answer them the best I can~

At the end of my class I think I lost 10% of my grade because I skipped the last few days LOL... I finished all my projects though -_-
June 1, 2014

DIY - Felt Card Holder Tutorial

Felt Card Holder Tutorial


In my textiles arts and crafts class last year, we made felt holders for a project.


The light green branches/leaves are an upside down fern stitch with pink & light yellow french knots as flowers.
(I don't really know what I was trying to do here, it looked better in my mind x_x
I think I was trying to imitate a garden with an archway that has hanging plants.)

The top stitch is a simple gold back stitch with a maroon pekinese stitch.
The main stitch is two maroon back stitches with a gold herringbone stitch (embroidered only in the back stitch and not in the actual felt) and a gold pekinese stitch on the top.
The pink at the bottom left corner are multiple french knots to look like roses/flowers.

The light pink felt flower was made from a tutorial I saw on Martha Stewart's website. In the middle of the flower are multiple french knots.

A blanket stitch was used to join the felt together.
The left pocket is horizontal while the right pocket is vertical.


MATERIALS:
- Felt, 6 piece embroidery thread, sewing needle, pins, a button, ruler and scissors.


Quick How-To Make/Instructions:

1. Measure how large you want the holder to be based on what you will be using it for (phone/MP3/cards etc)
Cut out 2 of the felt sizes (You will only be decorating/sewing 1 of the felt pieces so you can hide your embroidery with the other)
2. Measure & cut out your pocket sizes. (Optional: Blanket stitch the side of the pockets that will be open for decoration purposes.)
3. Embroider/sew decorations. (french knots, herringbone stitch, pekinese stitch, fern stitch, back stitch, etc)
4. Sew a button on one end & sew on a felt piece with a hole on the other end to be able to close the card holder when folded. (Optional: Use an elastic instead of a felt piece.)
5. Pin everything in place & do a blanket stitch all around to cover the raw edges. Try to keep your stitches as even & consistent as possible.


I actually don't have much use for this felt holder, but it was a fun way to practice & try new stitches.
If you have any questions, feel free to ask~ 
April 28, 2013

DIY Polymer Clay - Rose, 3-tiered Chocolate Strawberry Heart Cake & Multicolored Xiao Long Bao

 DIY POLYMER CLAY


Here are some pictures of things I made with polymer clay recently in my textiles class. :)
Sorry the pictures aren't very clear, I only had a cell phone camera. x_x

The rose & cake are pretty common, but for those who don't know what the colored things are . . well I was trying to make this. Multi colored xiao long bao! Ok but mine look a bit plump.

Soo, polymer clay is pretty fun to work with, but I think that it's best to work with small amounts. Using a huge chunk of clay makes my hands so tired =o=. But at the same time making all those tiny strawberries on the cake was painful as well. I still think small things are cuter though haha


Wow I really haven't posted much on this blog at all since 2013 huh . . hopefully I will be able to post a bit more after my exam. I think I will try to do some make-up reviews & such.

That's all for now~ Time to watch some Junjou Romantica 2!! I finished both seasons of Sekaiichi Hatsukoi as well <3>
Related Posts Plugin for WordPress, Blogger...